








Creating a child theme for Divi or WordPress is essential if you want to make your own customisations to the Divi theme or any other WordPress theme. It’s generally recommended by most web developers to ALWAYS create a child theme. This is especially tue if you are planning to make changes to the theme styles using your own CSS styles, or do something more advanced like adding your own Javascript, JQuery or PHP files.
Creating a child theme for Divi or WordPress is really quite simple, but if you’ve never done it before it can sound a bit daunting at first. let’s take a look at what a Child theme is, why you should use one and how you set it up.
What is a Child Theme and why should you use one?
A child theme is essentially a set of files that let you add your own CSS styles or code, linked to an original ‘parent’ theme. A child theme inherits everything from its parent theme. For example, if you create a child theme based on the Divi theme, everything that is available in Divi is available in your child theme. When you activate it, it will look and function exactly the same as Divi. It will have all the same options, the same back-end and front-end designer and all the same modules available. Absolutely everything will be identical.
Why should you use a child theme?
The benefit of using a child theme is that you can add your own CSS styles, Javascript and PHP code to override things in the parent theme. you can also add your own new and unique styles or code to use ON TOP OF the styles and code available in the parent theme.
If you update a WordPress theme directly, at some point you will need to update it to a newer version. When you upgrade a WordPress theme, all the files are replaced and if you made any changes to these files directly, your changes will be lost. The most important reason to use a child theme is that it does not overwrite anything in the parent theme files directly. When you upgrade the parent theme, the styles aod code you added to your child theme are not affected and stay in place.
To explain this in a simple way, imagine your child theme is like a skin over the top of Divi or any other WordPress theme. Your parent theme is there underneath and you can use all the features of that. Your child theme ‘skin’ sits over the top of it and let’s you give it a whole new look and add extra capabilities on top. If you update the parent theme, your child theme ‘skin’ is unaffected and still sits on top, so your website will look and work the same as it did before.
How do you create a Child Theme in WordPress?
Creating a child theme for WordPress is very simple. You only need three files:
- style.css – This is the main CSS stylesheet for your child theme. It contains details of the parent theme your child theme is based on and can be used to add your own CSS styles to override – or append to – the parent styles.
- functions.php – This file is required to load your child theme on WordPress and can also be used to load other files to your theme, such as additional Javascript files, PHP files, stylesheets or external files.
- Screenshot.jpg – This is an image used to represent your child theme. This image is what you see when you look in the WordPress Admin area at the available themes. It is not essential and if you do not create this then the image from the parent theme will be used instead. However, it’s generally recommended to create a new and unique image for your child theme.
Before you start
To create and install your child theme, you need to create a new folder and some files on your website.
Use an FTP client
You can use an FTP client for this and if you don’t have one, check out Filezilla and Cyberduck, which are both good – and free! – options for PCs and Macs.
Use Your Hosting Dashboard File Manager
Most web hosting dashboards (e.g. cPanel) also have a built-in file manager you can use to create folders and upload files instead.
Creating your Child Theme
We would strongly recommend following the steps this tutorial to manually create your Child Theme. It helps you understand what is required and how it works. It’s really not difficult!
However, if you would prefer an automated way to create your child theme, check out these options:
- Divi Child Theme Generator by Divi Cake
- Free WordPress Child Theme Generator
- Child Theme Generator WordPress Plugin by Lilaea media
Create your Child Theme folder
The first step is to create a new folder on your website for your child theme. It should be in the following location:
/wp-content/themes/
Give it a name appropriate for your child theme, for example we called ours ‘Divi Hype’.
It doesn’t matter what the name of your folder is, just make it something meaningful.
Create the style.css file
Next, create a new file in your folder and name it style.css. Now open up the file in a text editor and paste the following text into it:
/*
Theme Name:     {Your Child Theme Name}
Theme URI:      {Your website address or a link to where people can download the theme}
Description:    {A Description of your theme}
Author:         {Your Name or your Company Name}
Author URI:     {Your website address}
Template:       Divi
Version:        {version number, e.g. 1.0.0}
*/
Edit the details as necessary. The only parts that are critical to complete correctly are the Theme Name (the name you want to give your new child theme) and the Template (the name of the parent theme it is based on).
Here’s how we completed this for the ‘Divi Hype’ child theme we use on our website:
/*
Theme Name:     Divi Hype
Theme URI:      https://www.divihype.com
Description:    Divi Hype Theme based on Divi
Author:         Divi Hype
Author URI:     https://www.divihype.com
Template:       Divi
Version:        1.0.0
*/
Now save the file and move onto the next step.
Create the functions.php file
Now create another file in the folder and name it functions.php. Edit this file and paste the following into it, exactly as shown:
<!--?php
function load_child_theme_stylesheet() {
    wp_enqueue_style( 'parent-style', get_template_directory_uri() . '/style.css' );
}
add_action( 'wp_enqueue_scripts', 'load_child_theme_stylesheet' );
This part isn’t essential, but it’s nice to have an image that shows up when you view your theme in the WordPress Admin and clearly identifies it.
To create an image for your child theme, make a JPG or PNG file called screenshot.jpg or screenshot.png in a 4:3 ratio. WordPress recommends making the image 1200px wide by 900px tall.
Here’s the image we use for ours, if you want to download it and use it as a template:

Now upload this image file to your child theme directory. You should now have three files in your child theme directly, like this:

Activating your Child Theme
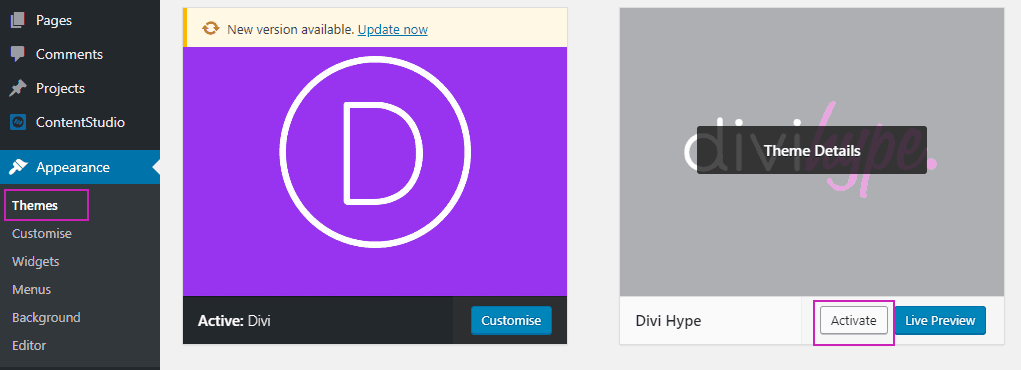
As long as you’ve followed all the steps correctly, you should see your child theme in the Admin area on your website and be able to activate it.
1) Go to Appearance > Themes
2) Hover over your child theme
3) Click ACTIVATE
This is shown below:
You’re all set!
Rounding up
Congratulations, you’ve installed and activated your child theme! Now if you need to make any CSS style changes, you can add them to your style.css file. IF you’ve found this tutorial useful, please leave a comment 🙂
Want an easier way?
Sign up for our mailing list and get your hands on our awesome HyperChild plugin, so you can create Child Themes in a SINGLE CLICK! We’re also throwing in ALL of our custom Divi module layouts totally FREE 🙂.
About the Author

Ed Solman
Entrepreneur, Blogger and Website Developer/Designer. Passionate about helping people and businesses develop and grow. Daredevil sportsbike enthusiast.

Hello! I’ve been following your weblog for some time now
and finally got the bravery to go ahea and give you
a shout out from Kingwood Texas! Just wanted to tll you keep upp the fantastic
work!
Thanks, glad you’re enjoying it. I’ll be posting a lot more soon!
We love your content. Regards from Pissouri Bay Divers from Cyprus.
tҺe website іѕ really good, I really like your blog!
Thanks 🙂