







Introduction
Recently, my wife and I have been working together on a customer website, so she wanted me to teach her the ropes with Divi. I’m pleased to say she has picked it up pretty quickly, testament to it’s ease of use for relative novices.
However, as with all things, there is always room for improvement. One particular bug-bear she had with it was the way you have to keep coming in and out of the Visual Builder when you want to switch pages.
As I’m sure you know, when you’re in VB mode, none of the hyperlinks on the page, including your top navigation menu, will work. So when you’re done editing one page and want to edit another, there are two options:
1) Exit Visual Builder. Use your menu to navigate to the page you want to edit. Enable Visual Builder again.
2) Type the new page address directly into the address bar. Enable Visual Builder again.
For anyone that is thinking of bringing it up, yes I know that visual builder mode is triggered by adding “&et_fb=1&PageSpeed=off” to the end of the page URL and for the technically minded amongst us, you maybe just do that manually. But for anyone not that technical, it can be a real pain switching modes and pages, especially when you’re working on a larger multi-page website like we are.
On top of that, if you’re building a development site that’s not performance optimised, it can take time coming in and out of Visual Builder, slowing down your workflow.
So that’s when I decided to do something about it, mainly to help my wife out, but having done it, I’ve realised it’s a really useful feature for me as well to help speed up my own website development!
“So, what the hell is it then?” I hear you ask! Well…
Imagine you have a new dropdown menu on your WordPress Admin bar at the top that lists all your pages and you can use it to quickly navigate between pages whilst STAYING IN VISUAL BUILDER MODE!
Still don’t get it? Don’t worry, I’ll explain and you can thank me later … 🙂
PRE-REQUISITES
To implement this, it’s essential that you are using a CHILD THEME as we will need to add some code to your child theme Functions.php file. If you’re not using a child theme, it’s easy to do.
Here’s our article explaining how to create a Divi Child Theme
STEP 1 – Create your Menu
First step is to create the menu you want to display in the dropdown. Create a standard menu in the WordPress admin area under Appearance > Menus . The simplest thing is to use your existing navigation menu, but that does not necessarily contain ALL the pages you want to be able to edit. For example, our site menus don’t contain pages like the ‘privacy policy’ or ‘terms and conditions’ which we would also like to edit with Divi. So we set up a specific menu containing all the pages we wanted.
When your menu is ready and contains all the right pages (remember you can always edit this later on), copy the name of your menu as you will need it in the next step. Here’s our standard DiviHype main menu, which we’ll use to demonstrate:

STEP 2 – Add this code to your Functions.PHP file
// Divi Hype - Add new WordPress Dropdown Menu to navigate pages in Visual Builder mode
add_action( 'admin_bar_menu', 'dh_pagenav_admin_bar_menu', 5000 );
function dh_pagenav_admin_bar_menu( $wp_admin_bar )
{
    // Add the NAME of your menu here
    $menu = wp_get_nav_menu_object( '[NAME OF YOUR MENU]' );
    $menu_items = wp_get_nav_menu_items( $menu->term_id );

    // If you want to display an image next to your menu (e.g. the website FavIcon or something, put the path to the file in here)
    $iconurl = '[PATH TO YOUR IMAGE TO DISPLAY]';

    $iconspan = '';

    // Enter a Title to be displayed for your menu in the Admin bar
    $title = __( '[TITLE FOR YOUR DROPDOWN]', 'edt' );

    // This adds the top level menu item
    $wp_admin_bar->add_menu( array(
        'id' => 'dh-menu-0',
        'title' => $iconspan.$title,
    ) );

    // This loops through the pages in your configured menu to display them in the Dropdown
    // It also adds the Visual Builder mode parameters onto the end of the Page URL
    foreach ( $menu_items as $menu_item ) {
        $wp_admin_bar->add_menu( array(
            'id' => 'dh-menu-' . $menu_item->ID,
            'parent' => 'dh-menu-' . $menu_item->menu_item_parent,
            'title' => $menu_item->title,
            'href' => $menu_item->url . '?et_fb=1&PageSpeed=off',
            'meta' => array(
                'title' => $menu_item->attr_title,
                'target' => $menu_item->target,
                'class' => implode( ' ', $menu_item->classes ),
            ),
        ) );
    }
}
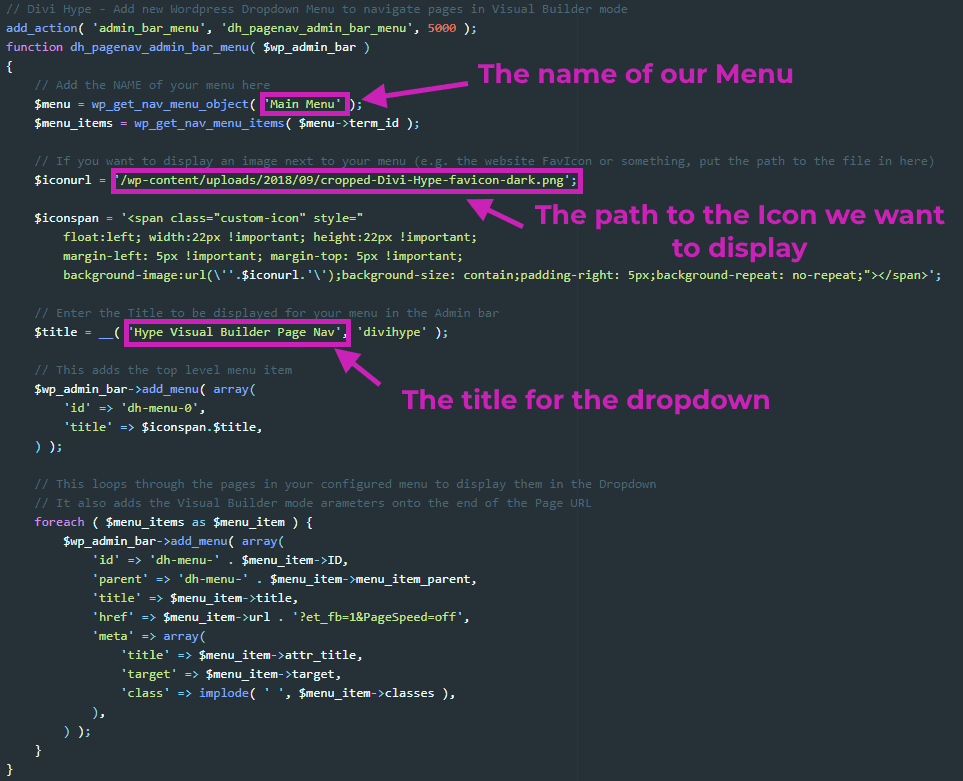
Here’s an example of hoe we implemented it on our site, including the Menu name (‘Main Menu’), the link to our favicon which will show up next to the menu and the Title for the dropdown menu:
BOOM, You’re Done
Now refresh your page and check out the awesome new dropdown menu at the top. Here’s what the final product looks like:

Click any page link and you are automatically in Visual Builder mode for that page. Make your changes, save them and use the navigation again to go to the next page you want to edit. No more coming in and out of the Visual Builder to edit a load of pages on your site.
If you found this tutorial useful, leave a comment!
About the Author

Ed Solman
Entrepreneur, Blogger and Website Developer/Designer. Passionate about helping people and businesses develop and grow. Daredevil sportsbike enthusiast.